After Effects Common Ratios Preset
A preset to create many common ratios as a reference for placement.

Manual Morph Cam for Cinema 4D
The Morph Cam feels unbaked, so I made my own with per-attribute controls. Available as-is in Redshift and Standard Cameras.

Individual Rounded Corner Box Preset
I made an after effects preset to create a box shape layer with individual rounded corners. There’s a main box, 4 circles, and fill boxes. If you need a shape layer box with a single corner rounded, you know where to look!
How to install ae presets: https://helpx.adobe.com/after-effects/using/effects-animation-presets-overview.html

Normal Edge Decal Textures
In this tutorial I mentioned that I couldn’t find any normal edge decal mats online so I figured I’d post my own. Feel free to download them individually or all of them here.
GSG HDRI-Link / HDRI Browser Thumbnail Generator
Note: this script proceeds gsg+ and is no longer necessary
Now that HDRI-Link supports individual lights, I was glad I could finally convert all of my Video Copilot Backlight HDRIs to work with it. There was only one pain-point: Making all the thummbnails!
I made a Photoshop action (available below) that takes in any image and resizes it for HDRI Link. It resizes your image to fit in a 400x200 image.
To make your own HDRI Link Pack with your personal collection of HDRIs, you need only go to this folder (or similar location on a mac):
C:\Users\ <USERNAME> \AppData\Roaming\MAXON\Cinema 4D R20_ <YOUR ID> \plugins\HDRI Browser\Packs
Any folder you make in this directory will become a new HDRI Link Pack! Within your new pack you need two folders.
HDRIsThumbnails
Place your HDR images into the HDRIs folder (must be .hdr, other file formats may not work) and run this photoshop action to make the thumbnails. After installing the action in Photoshop batch all of the thumbnail creation by selecting the HDRIs folder as the input and the Thumbnails as the output. Ensure the “Override Action “Save As” Commands” checkbox is on. As long as the thumbnail image jpg name matches the HDRI image hdr name everything will work smoothly.
Photoshop >> File >> Automate >> Batch...
You should now have a fully functional Custom HDRI Link Pack.
HDRI link also supports small and medium thumbnails at 160x80 and 240x120 respectively, You can alter the photoshop action if you want these as well. This action doesn’t support the HDRI link “Preview” version of an HDR because that image is actually a separate HDRI at a lower resolution.
I’m not affiliated with GSG, but have enjoyed making my own HDRI Link and HDRI Browser Packs of the HDRIs I’ve collected over the years. Action provided as-is without any support from me or GreyscaleGorilla.
Connecting Linear Wipe Completion to a Null Object
About a month ago Joe at Workbench tweeted about a linear wipe effect that was connected to an object. That felt right up my alley, and I figured I could make it happen.
I spent a day re-learning the necessary geometry and trigonometry in order to complete the issue, but ran into an issue with my logic. I had assumed that the effect went from screen-edge to screen-edge, but in actuality, if linear wipe always moves through the center, it actually stops at a point offscreen defined by the intersection of a perpendicular line from the center line through each of the adjacent corners. I gave up.
After coming back from a vacation, I decided to tackle it again and this time from scratch. I knocked out the whole effect in a few hours despite days of trying to get the math to work a month previously. Another hour over the next few days for bug fixes and it’s complete! Below is a rough outline of how the effect works.
The key is to realize there are essentially two “modes” in which to work in. One where the linear wipe angle intersects the top/bottom edges of the screen, and one where the angle intersects the left/right sides. Additionally, if you consider that 185° is essentially the same as 5°, only repeated, you can use the modulus function to make your range of work significantly smaller. By limiting what you need to deal with it makes the solution easier to make.
An important fact to remember is that the linear wipe effect can be an illusion. It might look like a diagonal moving across the screen in only the X or Y directions, but it’s actually functioning as if a movement path is always going through the center of the screen. By defining that line via the angle which runs through the center and defining a perpendicular line which runs through the null’s position, you can solve for the intersection of both lines and the keystone kernel of information for this effect.
Be doing geometric and trigonometric math, you can find the exact positions where the wipe “begins” and “ends.” Interpolating the intersection point relative to the end positions to find the correct completion percentage from there is simple algebra.
Below are two links where you can download a preset and AE project so you too can play with the linear wipe controller. The .aep also includes a breakdown from an earlier iteration with each step as it’s own layer as well as all of the visual feedback elements I created to ensure I didn’t make a mistake. The final effect has all of those elements abstracted as the expression (which I’ve tried to make pretty legible if you want to dive into it.)
Simply link the preset angle to the linear wipe angle, and then link the completion percentage to the slider. It just works!
I’d love to see what you make with this! Tag me on instagram or twitter @jctecklenburg.
Update Oct 6, 2018: I’ve updated the preset and project file to respect parenting.
Match Composition to Layer Size Script
After a misunderstanding in the office I’m at, Chip wondered if there was a hot-key to resize the composition to the currently selected layer. I was free and figured it would take no time, so I wrote it as a gift.
I modified Scale Composition.jsx that comes bundled with After Effects to check for a selected layer’s bounding box, scale the comp to that size, then reposition al layers relative to the new size.
Chip is a real person and the script is named after him, but this is mainly a joke. Have fun.
Update Oct 9, 2018: Use layer in point to determine bounding box instead of time = 0.

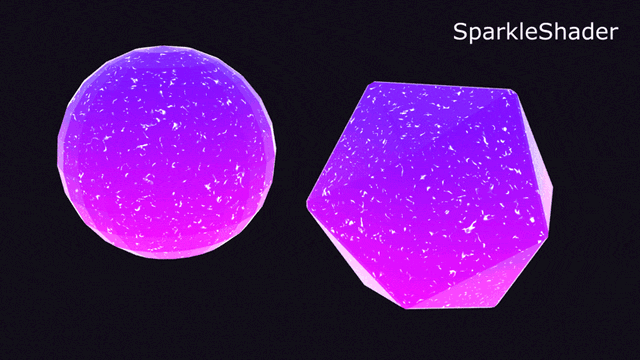
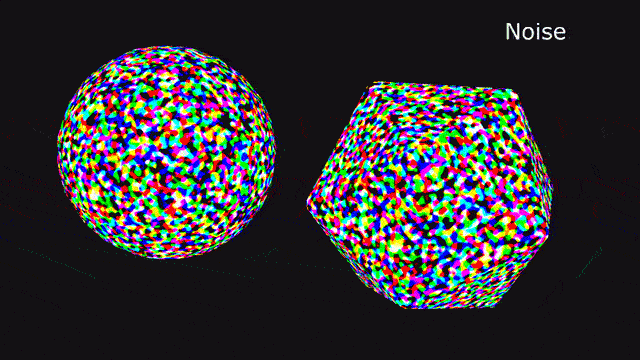
Adapting a real-time Sparkle Shader for Cycles4D
The #GameDev Community is just as open to sharing new ideas, techniques and secrets as the motion design community. Often the things they show can help optimize our own projects or present a new way of thinking about rendering.
I saw this tweet from Ron Fichman (@bobacupcake) about how he implemented a sparkle shader within unity and figured I could retrofit that workflow back into Cinema 4D; specifically within Cycles4D.
After an evening of translating code into nodes, trial and error, and only a little bit of lost sleep, I present to you the Sparkle Shader!
It works by converting colored noise into vectors, then checking if the random vectors match a vector to camera. The closer they are, the brighter the sparkle. The sparkles happen everywhere because they're random, and they fade on and off automatically as the random vectors line up with the camera.
It's not 100% the same because Cycles uses Perlin noise, the input numbers represent different things, and a few other reasons, but the core functionality is there. I'm incredibly excited to see what you make with it!